🚀 Getting Started with create-unirep-app
The create-unirep-app package provides a convenient and efficient way to build applications that leverage the power of UniRep. Developers can use the following guide to explore the example attester, and then customize the attester to suit their unique application.
💻 Run the application locally
Installation
- Run:
npx create-unirep-app
OR
- Clone the Unirep/create-unirep-app repository:
git clone https://github.com/unirep/create-unirep-app &&
cd create-unirep-app &&
yarn
Build the files
Navigate to the new directory and run:
yarn build
Start a blockchain environment with Hardhat
Run:
yarn contracts hardhat node
See hardhat tutorial
Deploy smart contracts
The UnirepApp.sol smart contract is an attester and interacts directly with Unirep.sol. Both smart contracts will be deployed in the Hardhat environment.
In a new terminal window, from root, run:
yarn contracts deploy
If Unirep.sol has been deployed in the testnet, specify the address of the Unirep.sol in the UnirepApp constructor:
constructor(
   Unirep _unirep,
   ...
)
The contract configurations will be written to create-unirep-app/config.ts
Start the relayer (backend)
The example attester hosts a relayer to handle requests from the frontend and post transactions to the blockchain. It also provides proving keys for the frontend prover.
To start the relayer, run:
yarn relay start
Proceed when Listening on port 8000 is displayed in the terminal.
Start the frontend server
The frontend is the users' interface to interact with the attester (UnirepApp.sol).
In a new terminal window, from root, run:
yarn frontend start
The frontend will be running at http://127.0.0.1:3000/ by default.
🏗️ create-unirep-app Architecture
It is important to note that the architecture of this application is different from that of traditional dApps, which require users to obtain ETH, use a browser wallet, understand gas fees, etc. This presents a steep learning curve for new users and a poor UX.
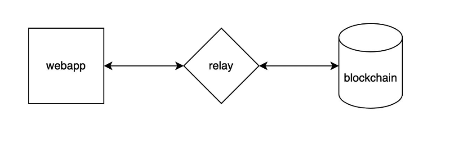
With create-unirep-app, the architecture is Web App <-> Relay <-> Blockchain. This reduces the cognitive load for a user new to blockchain appplications by abstracting that learning curve into the relay:
While use of the relayer is optional for a Unirep application, developers should be aware that if users send transactions directly to UnirepApp.sol, their privacy could be compromised.
🕹️ Interacting with the example attester
User Sign Up
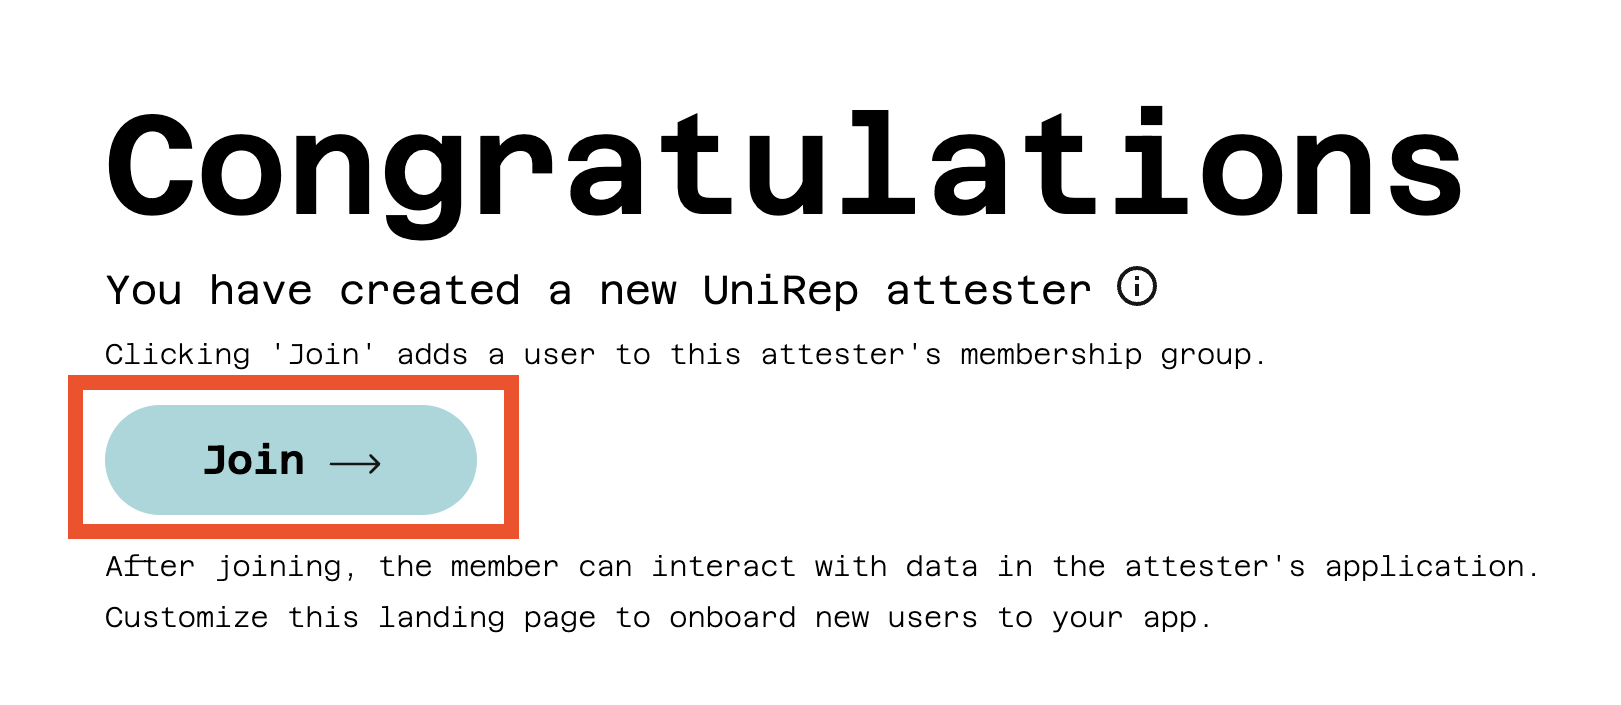
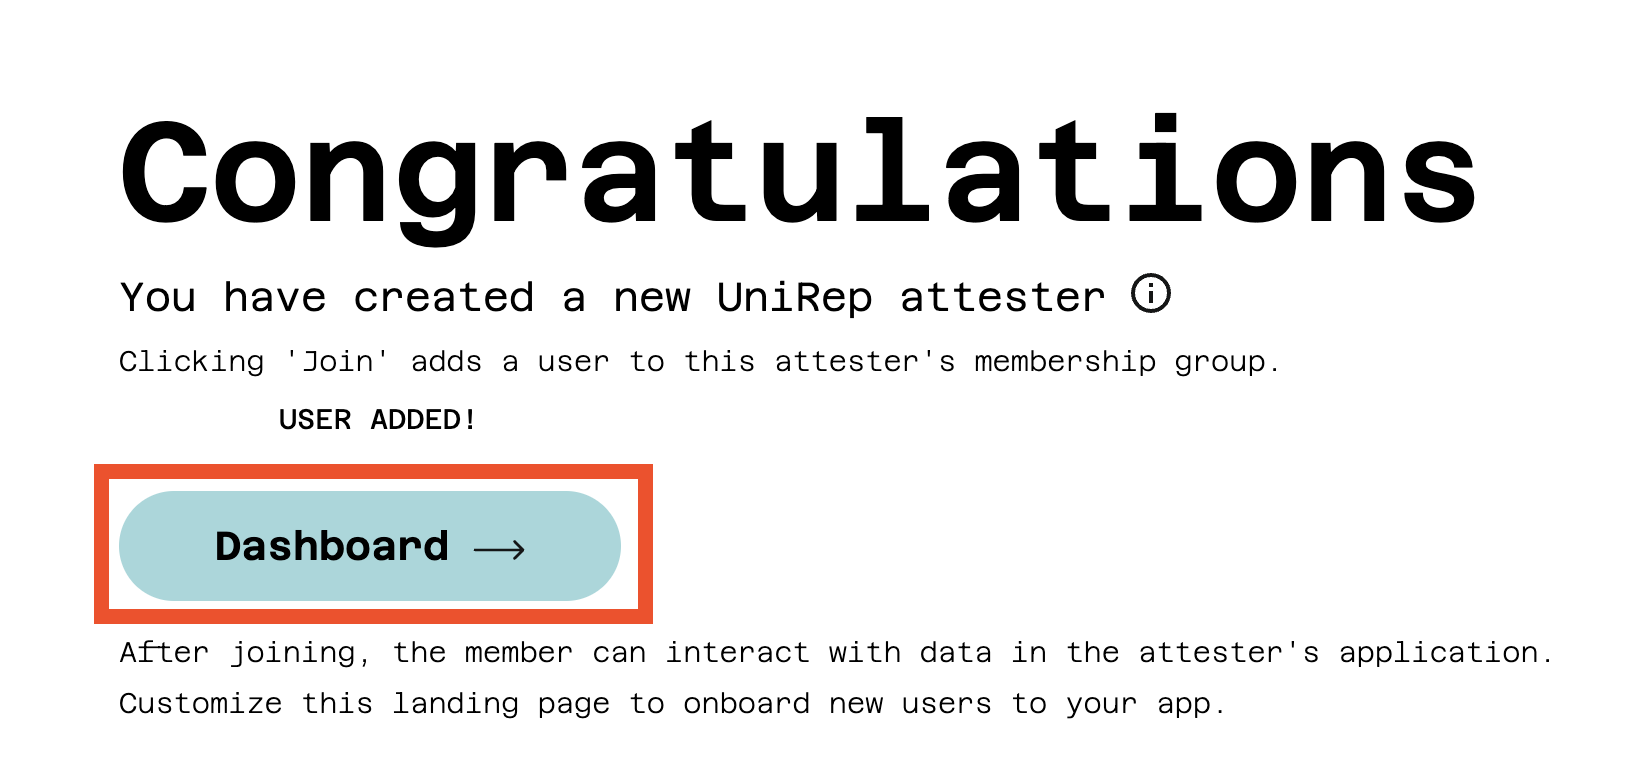
Clicking the Join button prompts the client to generate a Semaphore Identity and a signup proof.
The relayer will submit the signup proof to UnirepApp.sol and the client will store the Semaphore identity secret in the browser. When the transaction completes successfully, the user has been added to the attester's membership and can access the application with the Dashboard button.
Information
Epoch
Displays the attester's epoch details and the current user's last transitioned epoch.
Latest Data
Displays the user's total data, including data changed in the current epoch that can not yet be proven.
This is updated upon each data change request.
Provable Data
Displays only provable data that the user can currently prove ownership of. Any change made to the user's data since their last user state transition is not included here. This is updated after UST is performed.
Request Data

Change Data
In the example application, the user simply requests the data they want to receive. (Real attesters will implement their own logic to determine why and how data is attributed to their users.)
There are two types of data fields: sum fields and replacement fields.
- A sum field carries a total of all the data that has been added to it.
- A replacement field is used to fully replace old data with new data.
Users can choose which of their anonymous identifiers (epoch keys) will receieve the attestation by choosing an epoch key nonce. A unique identifier is generated for each epoch key nonce in each epoch.
# epoch key nonce = 0
Requesting data with epoch key:
0x2b4b15e0173f69807318198d5c1db6c00c44380af2e05912608950e10ba04b43
# epoch key nonce = 1
Requesting data with epoch key:
0x15e1358a646a10aa99756a250d9463b6026fbd09c5f4d28e477085f21eecd197
The data received by each of a user's epoch keys will be accumulated to that user.
e.g.
data[0] = 1 is requested by epoch key: 0x2b4b15e0173f69807318198d5c1db6c00c44380af2e05912608950e10ba04b43
data[0] = 2 is requested by epoch key: 0x15e1358a646a10aa99756a250d9463b6026fbd09c5f4d28e477085f21eecd197
1+2=3 so the final data[0] of the user is 3.
These epoch keys last for only one epoch. At the start of each epoch, new epoch keys are generated and old epoch keys become invalid.
Attest
Upon clicking the attest button, the following steps are executed to process an attestation:
- Client generates an epoch key proof to prove the epoch key is valid
- Client submits the epoch key proof and the requested data to the relayer
- Relayer uses
UnirepApp.solto call attest on theUnirep.solcontract - Frontend updates the user's latest data (data is not yet provable)
User State Transtion

A user state transition is performed manually by a user in any any epoch they want to participate in. The user will not be able to receive data if Current epoch # does not match Latest transition epoch (found under the Epoch section); UST must be completed first.
Clicking the Transition button executes the following steps:
- Client generates a user state transition proof
- Client submits the proof to the relayer
- Relayer updates the
Unirep.solcontract - Frontend updates the user's provable data
The latest user status has been recorded on chain; the user can now receive data in the current epoch and their updated provable data can be used to generate a data proof.
Prove Data

In the example attester, there is no functionality that requires proof of any data; individual attesters will define the purpose of proofs for their unique application.
The example input fields take the data a user wishes to claim. Clicking the Generate Proof button creates a data proof with the claim data and sends it to the prover to be verified. A proof will be valid if the claimed data is greater than or equal to the user's provable data.
e.g.
If user's provable data is:
Provable Data 0 = 2
Provable Data 1 = 3
Provable Data 2 = 4
Provable Data 3 = 5
the user can claim they have data:
Claim Data 0 = 2
Claim Data 1 = 2
Claim Data 2 = 2
Claim Data 3 = 2
because:
2 (Provable Data 0) >= 2 (Claim Data 0) # satisfied. 2 === 2
3 (Provable Data 1) >= 2 (Claim Data 1) # satisfied. 3 > 2
4 (Provable Data 2) >= 2 (Claim Data 2) # satisfied. 4 > 2
5 (Provable Data 3) >= 2 (Claim Data 3) # satisfied. 5 > 2
If the proof is valid, the frontend will display the proof and "Is proof valid? true" below the Generate Proof button.
If the proof is invalid, the snarkjs prover will throw an error.
e.g.
If user's provable data is:
Provable Data 0 = 2 👈
Provable Data 1 = 3
Provable Data 2 = 4
Provable Data 3 = 5
and they claim to own the data:
Claim Data 0 = 3 👈
Claim Data 1 = 3
Claim Data 2 = 3
Claim Data 3 = 3
The prover will throw an error because the fields with emojis do not satisfy the conditions:
2 (Provable Data 0) >= 3 (Claim Data 0) # not satisfied. 2 is not greater than or equal to 3
See the customized data proof circuit
App builders can customize their own ZK circuits and deploy verifiers to fit the application.
💡 Build your own application
Start by modifying the UnirepApp.sol contract.
See all Unirep.sol APIs
Define epoch length
Each attester sets its own epoch length, determined by the needs of the application. When deciding their attester's epoch length, developers should consider the following trade-offs.
Longer epoch lengths:
- allow users more time to receive new data, especially in cases with user-to-user interactions
- extend the time users must wait for changed data to be provable
- risk making users pseudonymous, as their activities may be tracked when using the same epoch keys for an long period of time
Shorter epoch lengths:
- allow users to prove new data sooner
- limit opportunities for users to receive new data, as their epoch keys expire quickly
- may enable a higher degree of user anonymity, as user's anonymous identifiers change more frequently
unit48 epochLength = 60 * 15; // 15 minutes
unirep.attesterSignUp(epochLength);
See attesterSignUp
Customize attestation policy
Attesters define their own systems to format user data and regulate how that data is attributed to users. An application's user data might represent aspects of a user's status, actions, associations, reputation, etc.
The attester may implement its policy with any combination of smart contract code (customizing UnirepApp.sol) and traditional application logic. (The application may require a user to satisfy an on-chain OR an off-chain condition in order to receive new data.)
e.g.
An attester wants to limit the amount of data a user can receive in each epoch. The code below utilizes a simple mapping to prevent an attestation to an epoch key if it has already received a value:
mapping(uint => bool) epochKeyReceivedValue;

function submitAttestation(
   uint epochKey
) public {
   // check if the epoch key has received data
   require(epochKeyReceivedValue[epochKey] == false);
   // compute attester ID: the address of the smart contract
   uint160 attesterId = uint160(address(this));
   // get current epoch from unirep
   uint48 targetEpoch = unirep.attesterCurrentEpoch(attesterId);
   // fix field index
   uint fieldIndex = 0;
   // fix data value
   uint val = 1;
   // call unirep attest function
   unirep.attest(
      epochKey,
      targetEpochs,
      fieldIndex,
      val
   );
   // mark the epoch key has received data
   epochKeyReceivedValue[epochKey] = true;
}
e.g.
An attester needs to track the total number of posts a user has made. The code below executes an attestation to increment the user's post count when the user submits a valid post. Note that this must be enforced on the server side:
<input
    type="submit"
    value="POST"
    onClick={async () => {
        // check if user is transitioned to current epoch
        if (
            user.userState &&
            user.userState.sync.calcCurrentEpoch() !==
                (await user.userState.latestTransitionedEpoch())
        ) {
            throw new Error('Needs transition')
        }
        // create new entry in off-chain database
        await app.createNewPost(postData)
        // submit attestation to increment user's post count
        await user.requestReputation({ [0]: 1 }, reqInfo.nonce ?? 0)
    }}
/>
See attesterCurrentEpoch
See attest
Verify epoch key
An epoch key proof is submitted when a request is made to change to user data. Attesters can choose to verify proofs off-chain (with a relay, as in the demo attester) or on-chain.
For example, UnirepApp.sol can be modified by adding the epoch key proof:
See EpochKeyVerifierHelper to learn how to deploy a verifier and its APIs.
- Import the
EpochKeyVerifierHelperfrom@unirep/contracts.
import { EpochKeyVerifierHelper } from '@unirep/contracts/verifierHelpers/EpochKeyVerifierHelper.sol';
- Sepcify the address of the deployed verifier.
// add a public verifier
EpochKeyVerifierHelper public epkVerifier;
constructor(
    // ...
    // pass the verifier address while construction
    EpochKeyVerifierHelper _epkVerifier
){
    // ...
    // set the public verifier to this address
    epkVerifier = _epkVerifier;
}
- Pass the
publicSignalsandproofto verify it in the function.
function submitAttestation(
    uint[] memory publicSignals,
    uint[8] memory proof
) public {
    // verify epoch key proof and check if the caller matches the attester ID in the proof
    epkVerifier.verifyAndCheckCaller(publicSignals, proof);
}
But how can we tell which signal is the epoch key?
EpochKeyVerifierHelper.sol provides decodeEpochKeySignals to fix this problem.
We can complete the submitAttestation function with decodeEpochKeySignals.
mapping(uint => bool) epochKeyReceivedValue;

function submitAttestation(
   uint[] memory publicSignals,
   uint[8] memory proof
) public {
    // verify epoch key proof
    epkVerifier.verifyAndCheckCaller(publicSignals, proof);
    // decode epoch key signals
    EpochKeyVerifierHelper.EpochKeySignals memory signals = epkVerifier
            .decodeEpochKeySignals(publicSignals);
    // check if the epoch key receives data or not
    require(epochKeyReceivedValue[signals.epochKey] == false);
    // compute attester ID: the address of the smart contract
    uint160 attesterId = uint160(address(this));
    // get current epoch from unirep
    uint48 targetEpoch = unirep.attesterCurrentEpoch(attesterId);
    // verify the state tree root in current epoch
    require(
        unirep.attesterStateTreeRootExists(
            attesterId,
            targetEpoch,
            signals.stateTreeRoot
        )
    );
    // fix field index
    uint fieldIndex = 0;
    // fix data value
    uint val = 1;
    // call UniRep attest function
    unirep.attest(
        signals.epochKey,
        targetEpoch,
        fieldIndex,
        val
    );
    // mark the epoch key has received data
    epochKeyReceivedValue[signals.epochKey] = true;
}
Now you can start building your own application with UniRep. 🚀